Everyone has their reasons as to why they want to set up name-based virtual hosts rather than IP-based virtual hosts on Apache.
For myself, I produce many small websites as part of my business as well as for my personal projects. It does not make sense to deploy an instance for each and every website, especially if many of the websites are small and low in traffic.
One way to save on costs is to use a shared hosting provider that gives an “unlimited” website and resources plan.
However, at times, I would rather not have my website on a shared hosting plan, or I may need something faster and more powerful. Or perhaps, I’m not familiar with who the reputable hosting companies are in certain regions where I’m planning to host my website at. (Shared hosting is not made equal; there great ones, and there are outright horrible ones)
This is where I will launch a cheap instance from AWS, Linode, Google Cloud or any other cloud or VPS hosting providers out there. These instances are really cheap yet powerful, giving you incredible value for your dollar. Many of them have data centers located all around the world, they let you choose the resources that you require, and I know that I cannot go wrong with any of them.
However, costs can also stack up if I deploy one instance for every website, especially if many of the websites are under-utilising the allocated resources.
Here is where knowing how to set up name-based virtual hosts comes in handy.
Why do I say so? Using name-based virtual hosts, you can then map multiple domains onto one IP address. This means that you can deploy a single instance with just 1 IP address and run multiple websites on that instance, will tremendously cut your running costs especially if you have many small websites!
There are some prerequisites to applying this guide.
1) You must be running Apache (such as a LAMP stack)
2) You need to be able to access and modify your Apache config
3) You need to have basic server administration knowledge
4) You need to have the urge to save lots of money 😄
Assuming your setup is running as an IP-based virtual host, the change to name-based virtual host is really easy once you understand how it works.
In this guide, my objective will be to host 2 WordPress sites (or could be anything else) using Apache's virtual hosts. The idea is to have 2 websites to load from the same IP address, so that I can essentially share the instance and resources between both sites. I will also be touching on enabling SSL on your sites with Certbot, and some basic redirection rules to get your sites automatically pointing to the HTTPS version.
The 2 websites I will be configuring will be virtual-host.xyz and virtual-host.icu. Don't bother checking out these sites as I only purchased the domains for the purposes of this demonstration.
So for this guide, I have launched an instance on Linode to show you the process.
Let's create an once-click instance and select LAMP. With this, all the required packages to run a WordPress site will be installed.
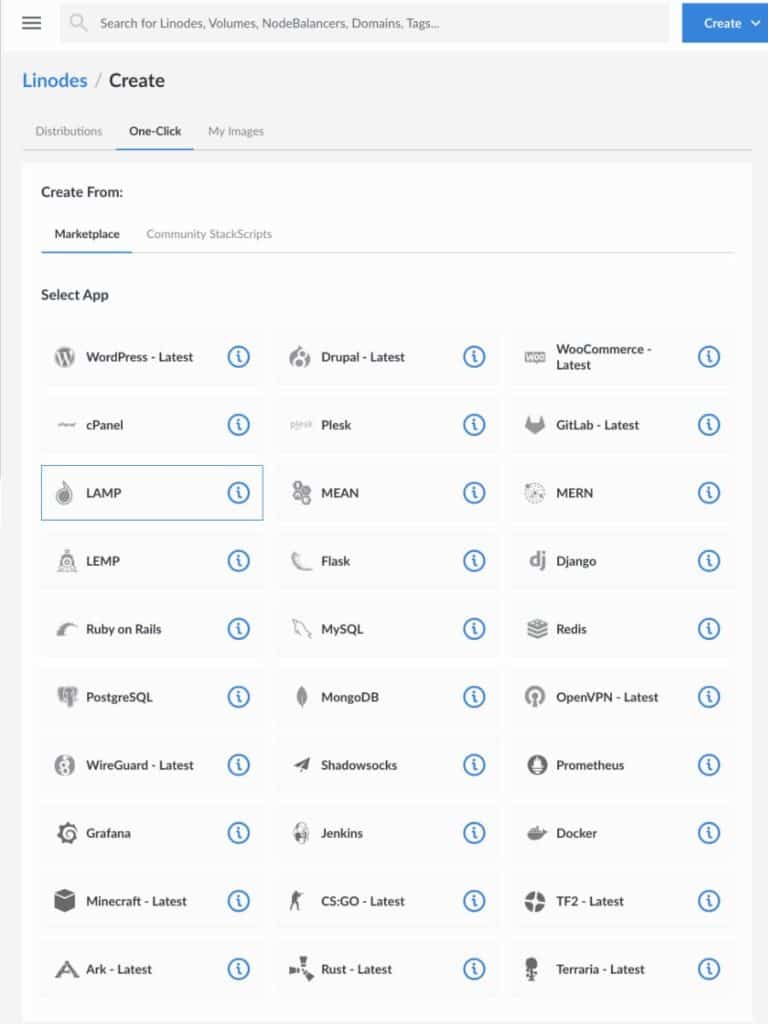
(Note that you can also choose a one-click WordPress installation, but I prefer starting off with a LAMP stack if I am working with multiple sites, as the configuration files are cleaner on the get go.)
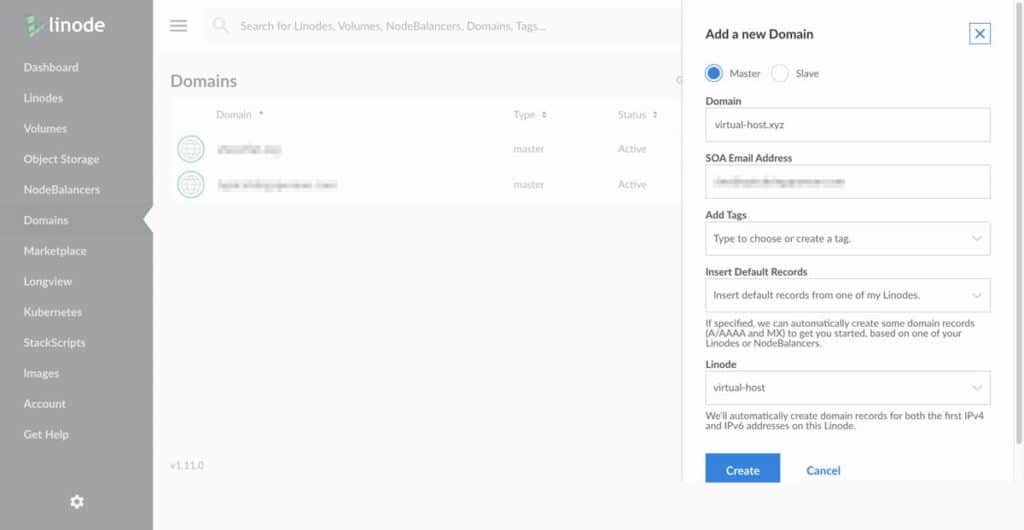
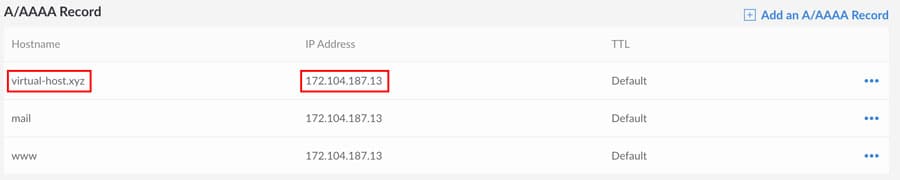
To ensure the DNS propagates as soon as possible, we shall first set up an A record to point your domains to the instance’s IP address. I will be using Linode's DNS to do so:
Once this is done, we shall remote login to our server’s network via SSH. Open up terminal and connect to your instance via SSH: (Substitute your values accordingly)
ssh [email protected]As with every new instance, we should make it a good habit to update and upgrade our packages .
sudo apt update && sudo apt upgradeBefore we configure our apache config files, we first need to create the separate directories which will contain our websites. The directories will then be specified in the relevant Apache config files later on.
For the site virtual-host.xyz:
sudo mkdir -p /var/www/virtual-host.xyz/public_htmlAnd for the site virtual-host.icu:
sudo mkdir -p /var/www/virtual-host.icu/public_htmlJust to make sure both of my new directories' permissions are set to 755:
sudo chmod 755 /var/www/virtual-host.xyz/public_html /var/www/virtual-host.icu/public_htmlNow since I have already created the file directories, I might as well create the databases first.
sudo mariadbcreate database virtual_1;
# Substitute virtual_1 to however you want to name your databasecreate user 'user_1' identified by 'password_1';
# Substitute user_1 and password_1 to however you want accordinglygrant all privileges on virtual_1.* to 'user_1';
# Same thing, substitute virtual_1 and user_1 accordinglyflush privileges;quitNext, let's go over to the folder that contains your Apache config file:
cd /etc/apache2/sites-availablelsWe should be able to see 2 files, 000-default.conf and default-ssl.conf. We will not be touching default-ssl.conf at all (Certbot will help us configure for SSL later on), so let's just make sure it's disabled:
sudo a2dissite default-ssl.confNext we shall take a look at the initial Apache config file that was provided to us:
sudo nano /etc/apache2/sites-available/000-default.conf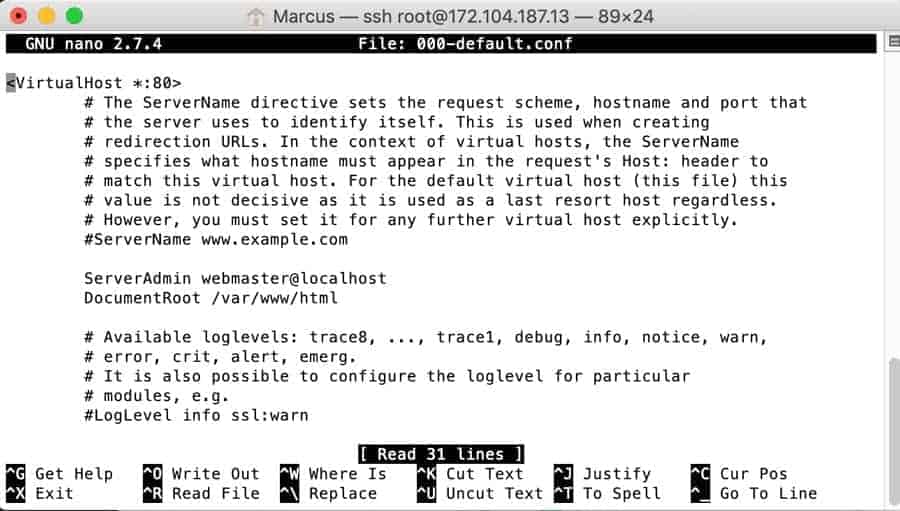
Base on the configuration above, you are running on an IP-based virtual host. To change it to a name-based virtual host, here are the steps.
Edit the 000-default.conf file accordingly, or to make things easier, wipe everything and input the following:
<VirtualHost *:80>
ServerName virtualhost.xyz
ServerAlias www.virtualhost.xyz
ServerAdmin webmaster@localhost
DocumentRoot /var/www/virtualhost.xyz/public_html
ErrorLog ${APACHE_LOG_DIR}/error.log
CustomLog ${APACHE_LOG_DIR}/access.log combined
</VirtualHost>
(Be sure to change virtualhost.xyz under ServerName, ServerAlias and DocumentRoot to your own domain name. ServerAdmin, ErrorLog and CustomLog will remain exactly as it is.)
For your second site, copy the same thing again and add it right below, on the same file. The entire file should now look like this:
<VirtualHost *:80>
ServerName virtual-host.xyz
ServerAlias virtual-host.xyz
ServerAdmin webmaster@localhost
DocumentRoot /var/www/virtual-host.xyz/public_html
ErrorLog ${APACHE_LOG_DIR}/error.log
CustomLog ${APACHE_LOG_DIR}/access.log combined
</VirtualHost>

<VirtualHost *:80>
ServerName virtual-host.icu
ServerAlias virtual-host.icu
ServerAdmin webmaster@localhost
DocumentRoot /var/www/virtual-host.icu/public_html
ErrorLog ${APACHE_LOG_DIR}/error.log
CustomLog ${APACHE_LOG_DIR}/access.log combined
</VirtualHost>
Then reload Apache:
sudo systemctl reload apache2So what this does is really simple. Each time a name-based http request comes in (or to put it simply, a visitor types in your domain and visits your site), Apache will point it to the relevant document directory according to how the config file is set. ServerName specifies the domain name, and DocumentRoot specifies where the files are located at.
Do note that this is for port 80, which is for http traffic. If you are intending to serve your website on https, we then need to set up the right redirections and create name-based virtual hosts for port 443 as well.
Note: You might have encountered older guides teaching you to declare the NameVirtualHost directive. If you are running in an updated setup, you do NOT need to explicitly declare this directive anymore. In fact, if you do so at this time of writing, you will receive a notification informing you on the upcoming deprecation:
NameVirtualHost has no effect and will be removed in the next releaseThe simplest way to do this is to add an index.html file to both directories. (Substitute your values accordingly)
sudo nano /var/www/virtual-host.xyz/public_htmlThis is virtual-host.xyz!sudo nano /var/www/virtual-host.icu/public_htmlThis is virtual-host.icu!Then we can load both sides and check if they are displaying the correct files.
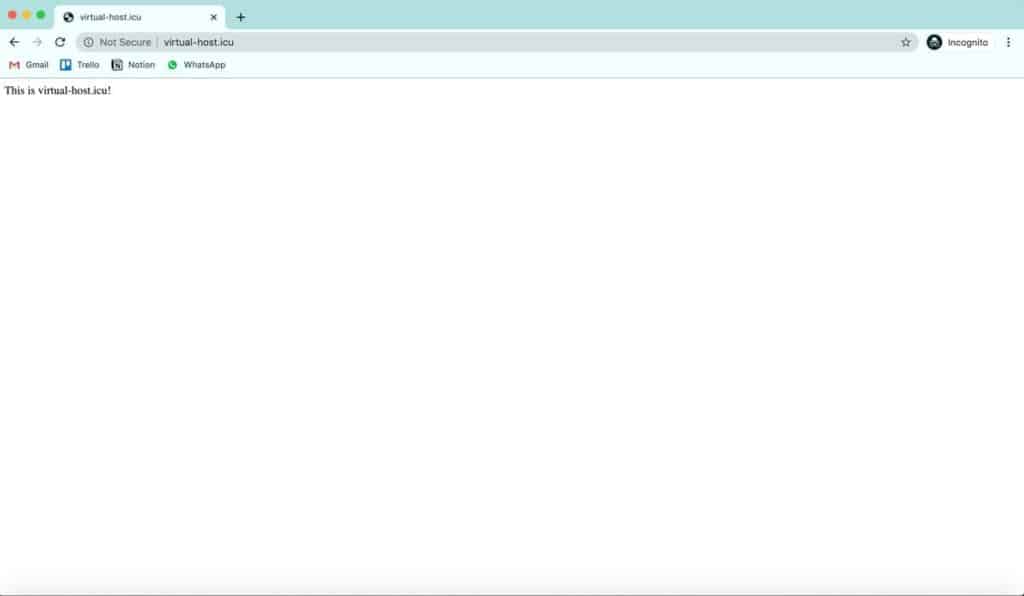
Remember to delete the index.html files once you have confirmed everything is working: (Substitute your values accordingly)
sudo rm /var/www/virtual-host.xyz/public_html/index.htmlsudo rm /var/www/virtual-host.icu/public_html/index.htmlNow what's the point of configuring for multiple websites if they are not SSL-enabled? In today's expectations, all websites need to be SSL-enabled, especially when Let's Encrypt provides free certificates. When I come across websites that are still not running on HTTPS, credibility points get knocked off right away. Also, according to Google themselves, having your site on HTTPS has been a ranking signal for many years, albeit a lightweight one.
Fortunately, Certbot makes the installation and renewal of Let's Encrypt SSL certificates a breeze. We need to first install Certbot:
sudo apt install certbot python-certbot-apacheOnce we are sure that our DNS has propagated and is pointing to our instance, we will then run Certbot on Apache:
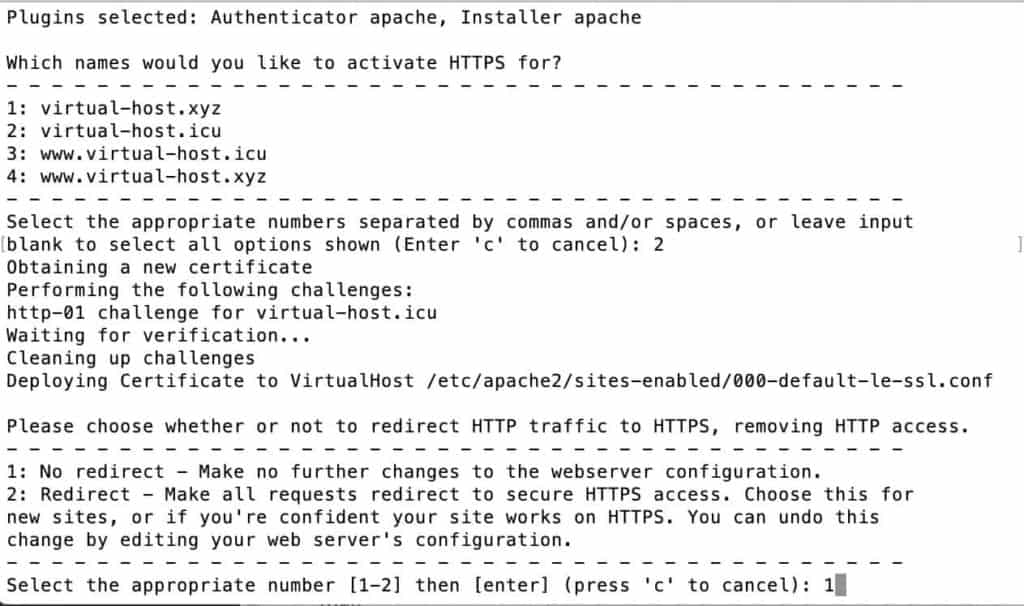
sudo certbot --apacheYou will be asked to fill in an email address, agree to the terms of service, opt for marketing email and choose the site that you want to install the certificate for.
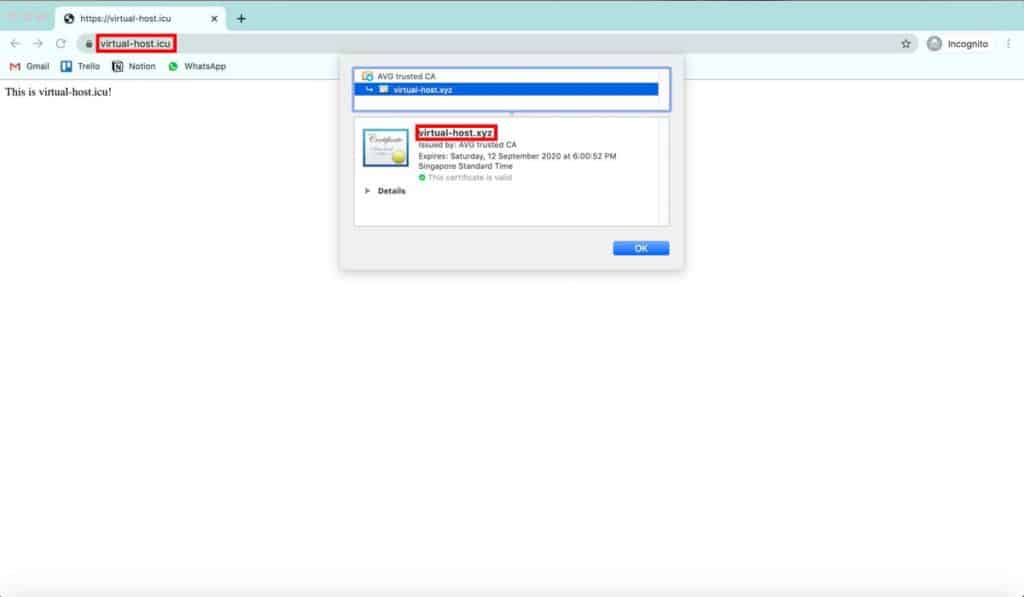
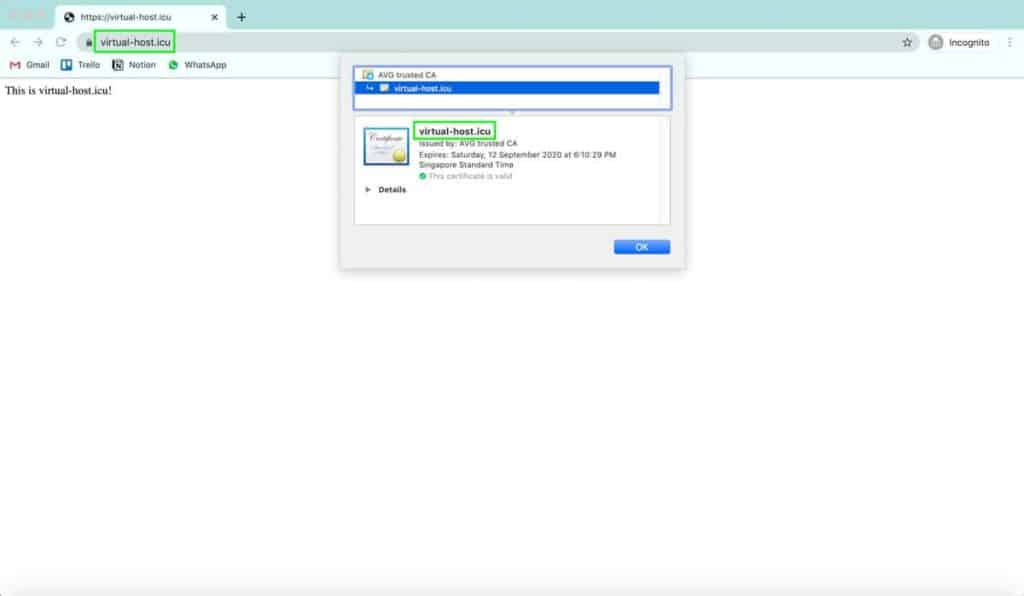
Now this part becomes a little tricky to proceed. You will be given a list of domain names and their respective www versions. You should only be installing the certificate for one domain at a time. Activating either one at a time or all at one go will still result in only 1 certificate being created, which means that all your websites will be using 1 common name for the certificate. Here is how a mismatched certificate looks like:
So to create matching certificates, you need run Certbot again for the next domain name and so on.
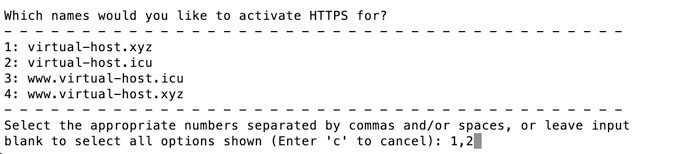
For this example though, I will activate all certificates in one go, and show you how to make adjustments again when we want to create unique certificates for each domain.
So back to where we were, I've selected both sites, option 1 and 2. I did not select 3 and 4 as I do not intend to run my site with the www subdomain.
Then choose the option to redirect http traffic to https: (This step adds redirection rules to our 000-default.conf file)

Once Certbot has completed the SSL certification creation, we are ready to double check our Apache config files. Note that a new file 000-default-le-ssl.conf has been added, and modifications have also been made to our existing 000-default.conf file.
sudo nano /etc/apache2/sites-available/000-default.confConfirm that the following redirection rule has been added to the file for all your virtual hosts:
RewriteEngine on
RewriteCond %{SERVER_NAME} =virtual-host.xyz [OR]
RewriteCond %{SERVER_NAME} =www.virtual-host.xyz
RewriteRule ^ https://%{SERVER_NAME}%{REQUEST_URI} [END,NE,R=permanent]
FYI: The above rule take http://virtual-host.xyz or http://www.virtual-host.xyz and redirects it to https://virtual-host.xyz.
Next, check that 000-default-le-ssl.conf has been configured correctly too:
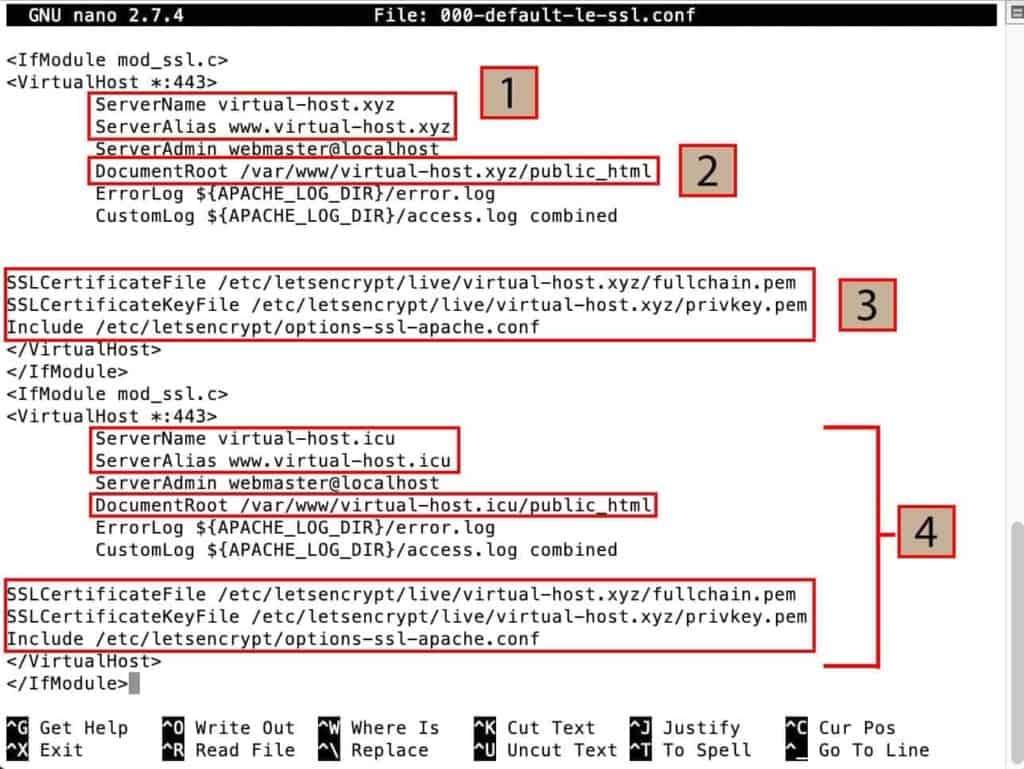
Once confirmed, reload Apache and your virtual hosts have been successfully configured with SSL:
sudo systemctl reload apache2In order for your certificate name to match your domain name, we have to run Certbot for each domain separately, according to what I mentioned previously.
Go ahead and run Certbot again for the domain you wish to add the certificate to. But this time round, do not select the option to redirect http to https as we have already configured that.
Once that is complete, located the folder containing all our SSL certificates:
cd /etc/letsencrypt/live/virtual-host.icuYou should find the files fullchain.pem and privkey.pem here. Note down the path and substitute it in our Apache SSL config file:
sudo nano /etc/apache2/sites-available/000-default-le-ssl.conf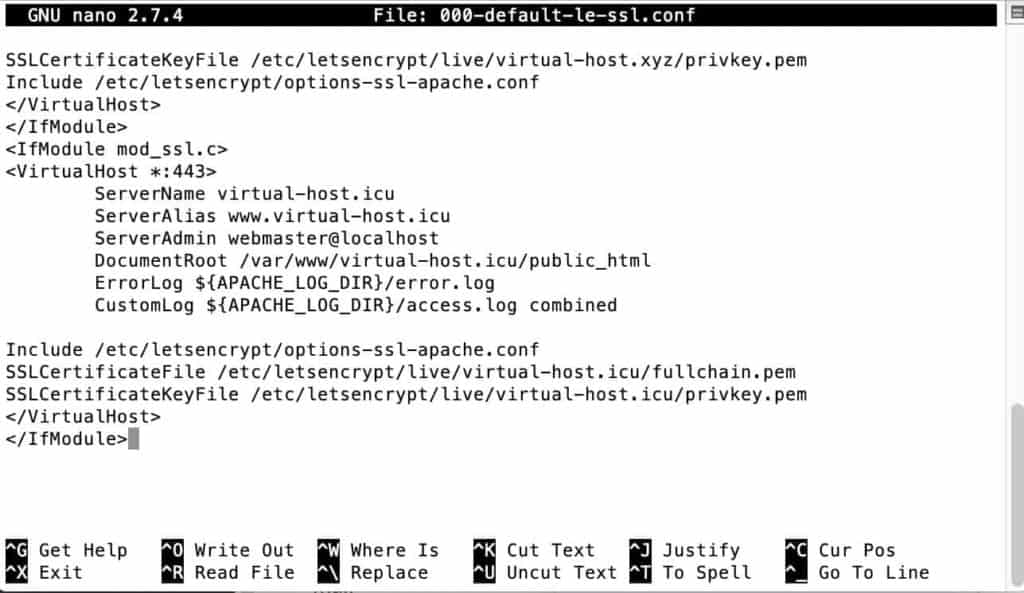
Then finally, reload Apache and you are done:
sudo systemctl reload apache2Your domain names should now be matching the respective certificate names.
Apache could not restart - This is a clear sign that your config file has errors in the syntax. Run the command: sudo apache2ctl configtest, and you will be pinpointed to the exact location of the error. Go back and fix it.
Forbidden 403 - This is usually caused by an incorrect virtual host setup. Go back and check every single line of the file to make sure you do not have any typos, such as missing a backslash or using curly double quotes.
The site address entered is loading the wrong website, or is caught in a loop - This is usually caused by incorrect redirection rules.
Typing in absolute URLs of my website into my browser causes 404 or 403 error - Again, very likely an error with your redirection rules. Map out all possible combinations, and find out what each one of them is doing by typing them one by one into your browser like this:
http://www.example.com
http://example.com
https://example.com
https://www.example.com
If everything is working fine. All of them should be redirecting you to only 1 final URL (important to keep this consistency especially for SEO).
I’m lost and have absolutely no idea what is going on - Perhaps, it’s better if you choose a managed approach, such as Cloudways. You can forget about the trouble of server administration and maintenance, and let Cloudways manage your server for you for just a few dollars more each month.
I hope this guide has been of help to you. Once you get a hang of how Apache configuration works, setting up name-based virtual hosts will eventually become easier. If you have further questions, feel free to leave them in the comments below, and I will try my best to help.
If you are seeing ‘Error Establishing a Database Connection’ on the homepage or any other page of your WordPress website, it means that there is simply no connection between your website and your database.

This article will explain what a database is and how it functions in relation to your WordPress site, and also a couple of things you can do to fix the problem if you are facing this issue.
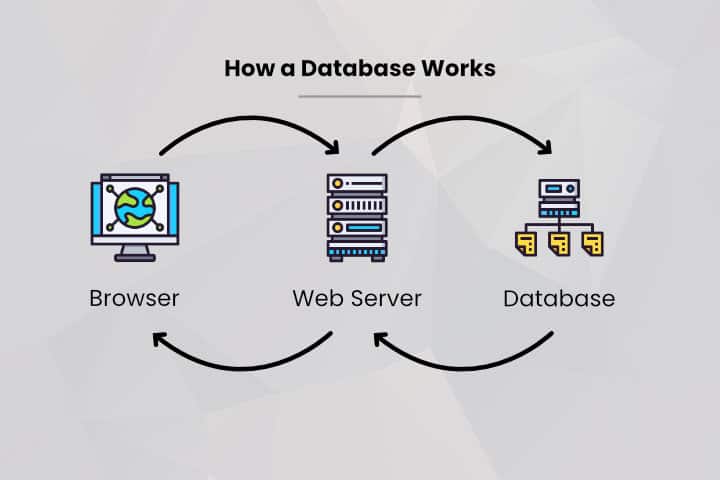
Database is just a collection of your data that is stored on your server. WordPress requires a database to function as that is where it stores your website’s data such as your pages, posts, users and other content. All these content are stored separate from your website files so that content can be easily managed and accessed.
Think of it this way. Your website files contain your themes, plugins and configuration files, things that are static and do not typically change on a live website. Whereas, your database is always changing and growing as you add content to your website.
The separation of your static files and content is the basis of how WordPress or any other CMS (content management system) works.
This issue typically happens after completing a hosting migration.
It is likely that your database credentials are not set right in your wp-config.php files. The main purpose of the wp-config.php file is to tell your website where to find the right database, and to provide the credentials to access it.
There are 3 important fields within the wp-config.php file that you have to configure in order to connect your website to your database successfully.
For a successful connection to your database, the user also has to be granted access to the database itself. This will be covered later.
First of all, we want to dig into the wp-config.php file to check on the configuration. There are 4 lines in the file that will matter:
define( ‘DB_NAME’, ‘database_name’ );
define( ‘DB_USER’, ‘user_name’ );
define( ‘DB_PASSWORD’, ‘password’ );
define( ‘DB_HOST’, ‘localhost’ );
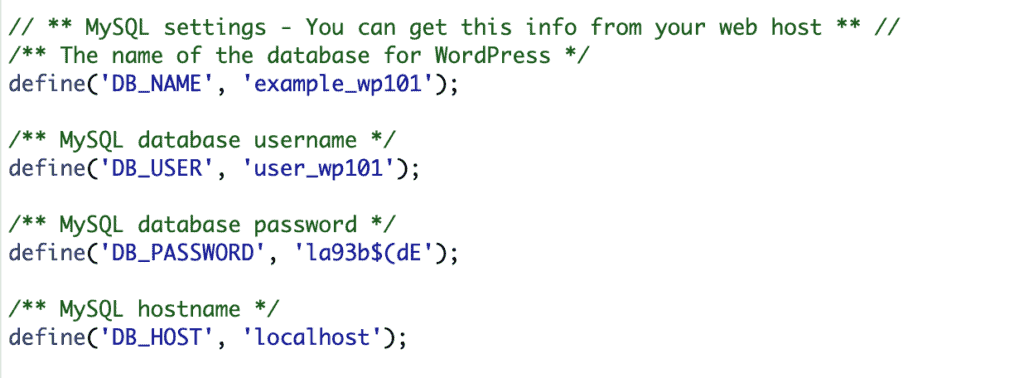
Note down the following according to what you see in your configuration:
The idea from this point onwards, is to make sure that the configuration file is matching your actual database credentials. So the next step is to find out what your database credentials are.
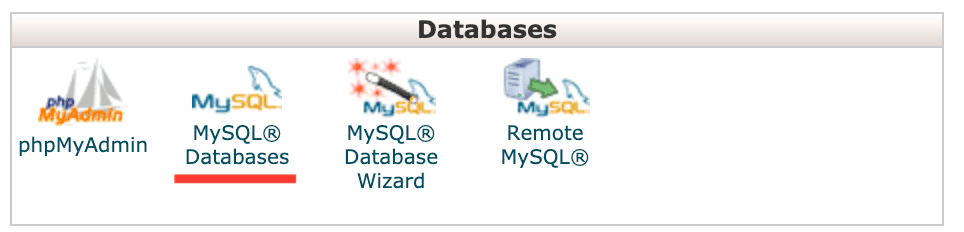

To access your database, you will want to go into your hosting control panel and click on MySQL Databases.
Here you will be able to see your database name, note this down. In my example, it is called example_wp101.
If you have multiple WordPress sites on a single hosting, then you might have a list of different databases here. In order to find out which database is the one that is supposed to link to your website, we will have to access the tables in the database.
Go back to the dashboard of your control panel, and click on phpMyAdmin. (MySQL Databases has different functions from phpMyAdmin. MySQL Database helps you manage all your databases at the top level, where phpMyAdmin lets you access the information within the database itself.)

In order to identify which the right database is, you will have to check each one manually. Click on one of the database and it should drop down the list of your database tables.
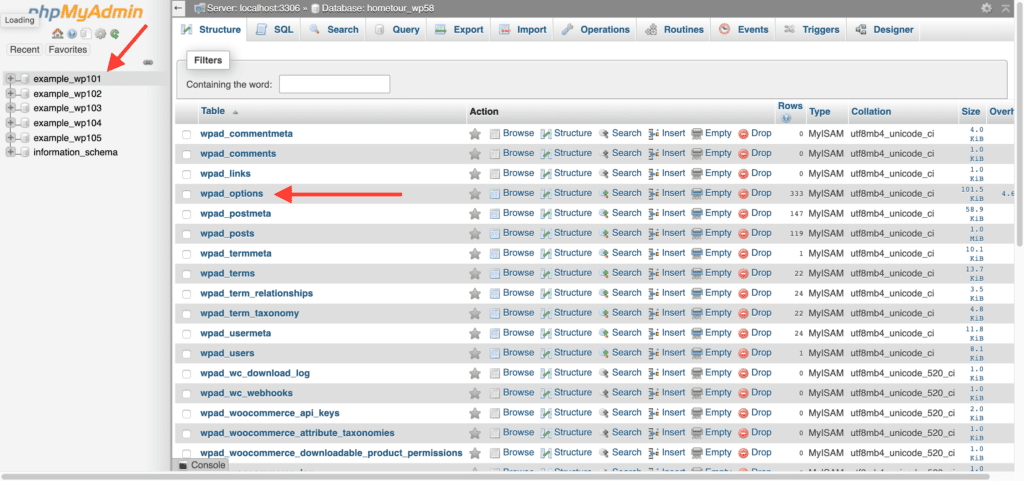
Then, you will need to identify the table that ends with "_options". In this example, it’s wpad_options.
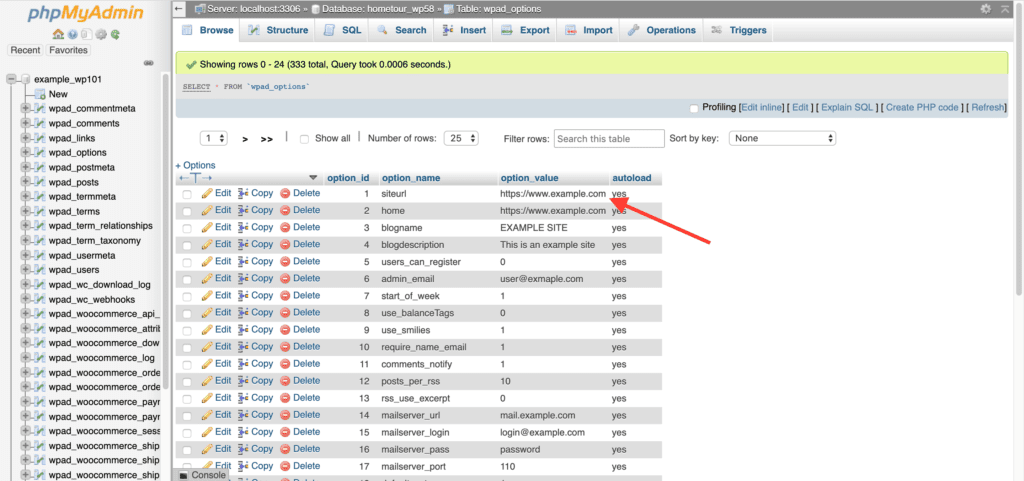
Once you click on that, you will then be able to see the entries where one of the rows will show you your siteurl under option_name and your website address (https://www.example.com) under the option_value. If the website address matches the one in question, then you know that this is the right database.
Next, you want to go back to MySQL Databases and find the user that is connected to your database. This can be seen under the Privilege Users column that is inline with the Database. Note this down too. In my example, it is called user_wp101.

For security reasons, you will not be allowed to see the password, so you can use the Change Password function instead to create a new one. Make sure to create a strong and unique password, and note this down.
(Before changing your password, check whether your database and user matches your wp-config.php configuration in the ‘Checking if the wp-config.php Credentials are Correct step’, because if they match, then it is likely that your password is already matching)

In order for the user to access the database, the user has to be granted the privilege to do so. This can be checked under Current Databases, Privilege Users column. If there is no user here, you can use the Add User to Database function, and connect the right user to the right database.
Now is the time for you to compare the wp-config.php credentials to the ones that you have noted down. If the database and user does not match, then you simply have to change the values in the wp-config.php file to the ones you have noted down and you should be able to successfully load your WordPress website.
You can identify a corrupted database when you see an error message saying “One or more database tables are unavailable. The database may need to be repaired”.
The issue is slightly different from the first one. The first one is not being able to access your database at all. While for this case, your website is able to access the database, but is somehow not being able to read the tables from the database.
The simplest fix to this is to use WordPress’s database repair function. This function is not available to use right out of the box, and must be activated first. To activate it, go to your wp-config.php file and add in this line before “That’s all, stop editing! Happy blogging’:
define(‘WP_ALLOW_REPAIR’, true);
Once you have done that, you will get access to the following page: (change example.com to your domain name)
http://example.com/wp-admin/maint/repair.php
You can then proceed with 2 choices, either ‘Repair Database’ or ‘Repair and Optimize Database’.
Once you are done, remember to go back into your wp-config.php file and remove the code that we added earlier. This is important as anyone that goes into the URL will have access to the database repair function even if they are just a visitor and not logged into your WordPress admin.
Under your control panel, click on phpMyAdmin. If you are not able to load your databases and tables at all, then it is a huge sign that your database is down at this point.
To verify, you can also create a php file to test out the connection to your database by adding the following code to a newly created file called databasetest.php:
<?php
$link = mysqli_connect(‘localhost’, ‘username’, ‘password’);
if (!$link) {
die(‘Database is down, ‘ . mysqli_error());
}
echo ‘Success!’;
?>
Then load example.com/databasetest.php and you will be able to check if your database is down. (change example.com to your domain name)
If you have determined that your database is down, you should reach out to your hosting support to get it checked.
If you are using a self-managed VPS, you can also run the following commands via SSH to check on the status of your database:
sudo systemctl status mysql
or
sudo service mysql status
If at this point things are still not working even after trying all the above, perhaps it’s time to get a professional to help. You should first contact your hosting support, as most of the time, they have the ability to look into your configurations and fix the problem for you.
If you are not getting the right help, you could also hire an affordable WordPress troubleshooting service, such as https://www.wpfixit.com/.
Tired of adding CNAME records over and over again whenever you have to create a new custom subdomain on Swipe Pages? Well this neat little trick will allow you to set up your CNAME records once, and never have to touch it again whenever you have to create new subdomains on Swipe Pages.
Well, this is not really a trick. It is actually setting up a simple wildcard CNAME record. This record will "catch" any subdomains the user enters, and point it to the same target that you have specified.
Swipe Pages provide the same CNAME target whenever you create new subdomains. So this means that whenever you set up a new subdomain on Swipe Pages, it will be covered by the wildcard CNAME, and you do not have to manually create a new CNAME record for that anymore.
Existing or normal CNAME records will always take precedence over wildcard CNAME records. This way, you have more control in specifying the subdomains that you want to point elsewhere, and not to Swipe Pages.
You need a DNS with wildcard CNAME facility. I'm using Cloudflare's DNS, and they provide the option to use wildcard CNAME records. If you do not have a Cloudflare account, you can register one for free and use their DNS. The functions that I will be showing you does not require a paid plan.
Follow along as I guide you on this detailed walkthrough on how to configure a wildcard CNAME record.
Before showing you how to set up a wildcard, let's take a look at what happens without one. Let's say I have 3 subdomains that I want to create on Swipe Pages, australia.dashways.com, belgium.dashways.com and china.dashways.com. I will then have to input each one individually in separate CNAME records for each of them. Furthermore, whenever I need to add more subdomains in the future, such as denmark.dashways.com, england.dashways.com, etc, I will have to create unique individual CNAME records for these as well.

Following the same example as above, I only need to create 1 CNAME record to cover all subdomains, including future subdomains that I eventually create.
All you need to do to activate this wildcard is to add an asterisk in the Name field (*). (Remember that not all DNS providers support wildcard CNAMEs like Cloudflare, so check first if it's available)

Once you have done this, Cloudflare will recognize this as a wildcard CNAME and will point any subdomains to the target that you have specified, unless there are other CNAME records that exist, which will override the wildcard in an individual level.
You no longer need to manually key in CNAME records for each subdomain that you create on Swipe Pages from here on!
If you found this guide useful, be sure to also check on my other guide on how to use a root domain with Swipe Pages with wildcard matching.
So currently as of writing, the only way we are able to link up custom domains to Swipe Pages is with CNAME records.
It works flawlessly, but there is one minor problem. We aren't able to use just the root domain (a non-www version of the domain, also known as a naked domain). While that still stands true, we are however able to redirect the non-www domain to a www domain, which can then be linked to Swipe Pages via CNAME records.
For those that aren't clear on the limitations of CNAMEs, here is a quick insight. CNAMEs cannot be used on the root of a DNS zone. Only an A or AAAA record can be used for the root. So for example, if you want to use dashways.com as your Swipe Pages custom domain, that is currently not possible, as Swipe Pages only offer connection by CNAME. Therefore, we use the subdomain www to connect to Swipe Pages, like this: www.dashways.com.
Some of you may also say that you already prefer using a www domain. But that does not mean that setting up a CNAME is sufficient enough. Here's the problem, it is common, and in many cases, second nature, for people to omit the www when entering your website URL into the address bar. Without the right configuration, a user that types a non-www domain into the address bar will either see a broken site or a completely different site.
So in order for a non-www domain to be redirected to the www version, we need to set up a redirect rule of some sort.
I will be using Cloudflare for this example. If you do not have a Cloudflare account, you can register for one for free. You do not need a subscription plan for the configurations I'm about to show you at all (I'm using the free plan myself).
Follow along in this detailed walkthrough on how you can configure the redirection of your root / naked domain to the www version.
Register for a free Cloudflare account, follow through with the setup and change your nameservers to the ones provided by Cloudflare.
Here is an example of changing nameservers on Namecheap:

Once everything is verified, proceed to the next step.
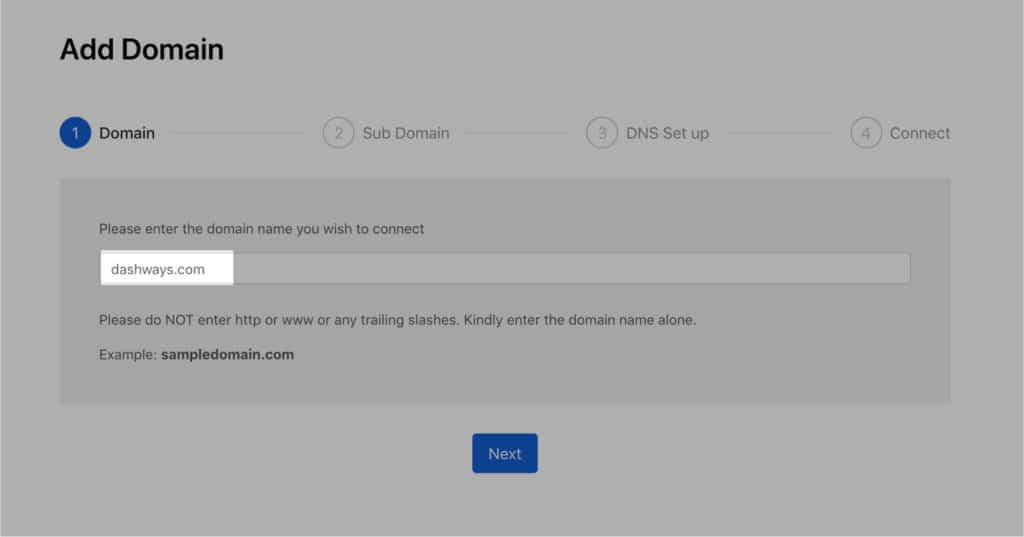
Go to your Swipe Pages dashboard, and go to the Domains tab, then click on Add New Domain. Enter your root domain here without the www, and go on to the next step.
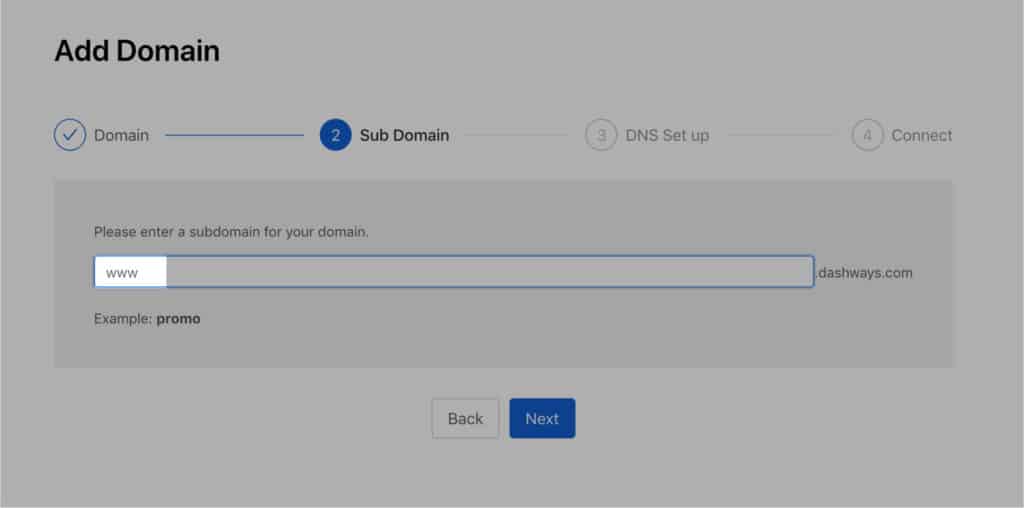
When asked to enter your subdomain, fill in "www", then proceed on.
You will be given a VALUE field, copy that to your clipboard.
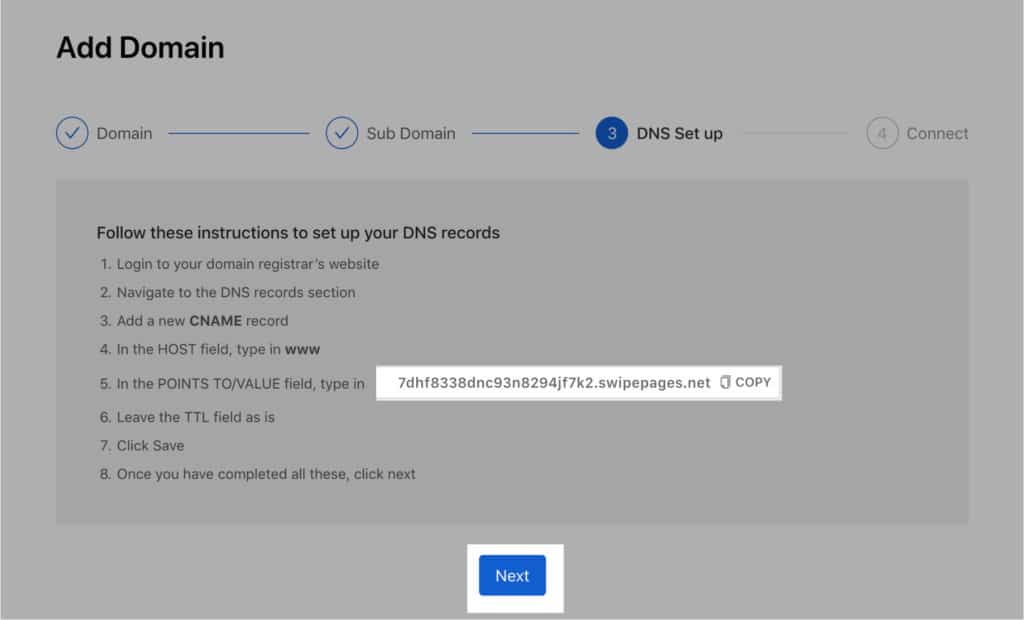
On Cloudflare, head over to the DNS tab, and click on Add record.
Important Note ( 20 January 2022): Do not set 1.1.1.1 as the IPv4 address for your A record as this will lead to Cloudflare Error 1034 - Edge IP Restricted.


On Cloudflare, head over to the DNS tab, and click on Add record again.

Head back to Swipe Pages and click on the Connect button to verify your domain. You may need to wait until the DNS is fully propagated. Once done, create a sample page and map it to your custom domain to test that this is working. You should be able to load your page with the www in your subdomain.

In order to redirect your non-www visitors to the www version, we will need to set up a page rule on Cloudflare. Head over to the Page Rules tab, and click on Create Page Rule.
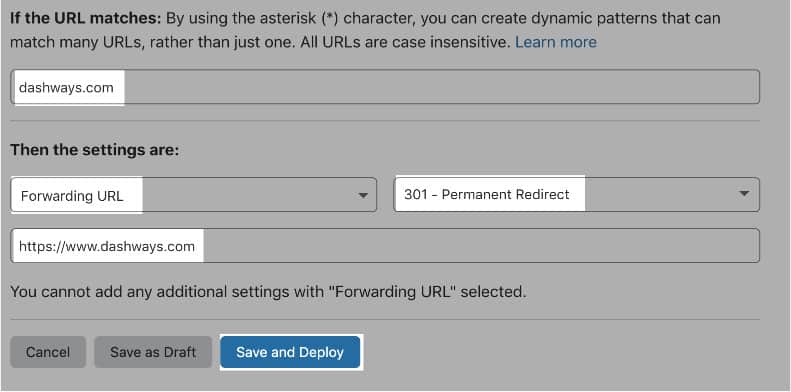
If you are intending to create a site with multiple pages, eg. www.dashways.com, www.dashways.com/services, www.dashways.com/contact, etc, then you will want your page rule to cover all your pages, not just for the homepage. With reference back to Step 6, use this version instead:
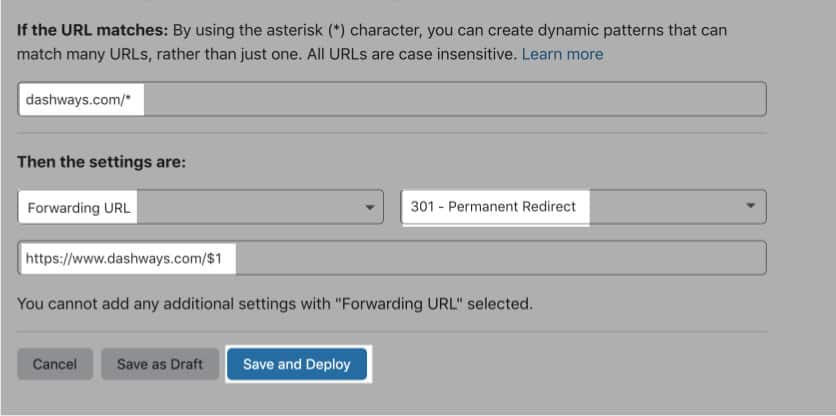
With this rule in place instead, all pages, not just the homepage, which are directly entered in as a root domain, will be redirected to the www version. As a general rule of thumb, you should be using wildcard matching by default.
I hope that this guide gave you more clarity into how CNAME functions, and helped you out with your custom domain configuration on Swipe Pages.
In my next post, I will be sharing a little trick on how you can set up your CNAME once, and never have to touch it again even if you create new subdomains on Swipe Pages.
