Tired of adding CNAME records over and over again whenever you have to create a new custom subdomain on Swipe Pages? Well this neat little trick will allow you to set up your CNAME records once, and never have to touch it again whenever you have to create new subdomains on Swipe Pages.
Well, this is not really a trick. It is actually setting up a simple wildcard CNAME record. This record will "catch" any subdomains the user enters, and point it to the same target that you have specified.
Swipe Pages provide the same CNAME target whenever you create new subdomains. So this means that whenever you set up a new subdomain on Swipe Pages, it will be covered by the wildcard CNAME, and you do not have to manually create a new CNAME record for that anymore.
Existing or normal CNAME records will always take precedence over wildcard CNAME records. This way, you have more control in specifying the subdomains that you want to point elsewhere, and not to Swipe Pages.
You need a DNS with wildcard CNAME facility. I'm using Cloudflare's DNS, and they provide the option to use wildcard CNAME records. If you do not have a Cloudflare account, you can register one for free and use their DNS. The functions that I will be showing you does not require a paid plan.
Follow along as I guide you on this detailed walkthrough on how to configure a wildcard CNAME record.
Before showing you how to set up a wildcard, let's take a look at what happens without one. Let's say I have 3 subdomains that I want to create on Swipe Pages, australia.dashways.com, belgium.dashways.com and china.dashways.com. I will then have to input each one individually in separate CNAME records for each of them. Furthermore, whenever I need to add more subdomains in the future, such as denmark.dashways.com, england.dashways.com, etc, I will have to create unique individual CNAME records for these as well.

Following the same example as above, I only need to create 1 CNAME record to cover all subdomains, including future subdomains that I eventually create.
All you need to do to activate this wildcard is to add an asterisk in the Name field (*). (Remember that not all DNS providers support wildcard CNAMEs like Cloudflare, so check first if it's available)

Once you have done this, Cloudflare will recognize this as a wildcard CNAME and will point any subdomains to the target that you have specified, unless there are other CNAME records that exist, which will override the wildcard in an individual level.
You no longer need to manually key in CNAME records for each subdomain that you create on Swipe Pages from here on!
If you found this guide useful, be sure to also check on my other guide on how to use a root domain with Swipe Pages with wildcard matching.
So currently as of writing, the only way we are able to link up custom domains to Swipe Pages is with CNAME records.
It works flawlessly, but there is one minor problem. We aren't able to use just the root domain (a non-www version of the domain, also known as a naked domain). While that still stands true, we are however able to redirect the non-www domain to a www domain, which can then be linked to Swipe Pages via CNAME records.
For those that aren't clear on the limitations of CNAMEs, here is a quick insight. CNAMEs cannot be used on the root of a DNS zone. Only an A or AAAA record can be used for the root. So for example, if you want to use dashways.com as your Swipe Pages custom domain, that is currently not possible, as Swipe Pages only offer connection by CNAME. Therefore, we use the subdomain www to connect to Swipe Pages, like this: www.dashways.com.
Some of you may also say that you already prefer using a www domain. But that does not mean that setting up a CNAME is sufficient enough. Here's the problem, it is common, and in many cases, second nature, for people to omit the www when entering your website URL into the address bar. Without the right configuration, a user that types a non-www domain into the address bar will either see a broken site or a completely different site.
So in order for a non-www domain to be redirected to the www version, we need to set up a redirect rule of some sort.
I will be using Cloudflare for this example. If you do not have a Cloudflare account, you can register for one for free. You do not need a subscription plan for the configurations I'm about to show you at all (I'm using the free plan myself).
Follow along in this detailed walkthrough on how you can configure the redirection of your root / naked domain to the www version.
Register for a free Cloudflare account, follow through with the setup and change your nameservers to the ones provided by Cloudflare.
Here is an example of changing nameservers on Namecheap:

Once everything is verified, proceed to the next step.
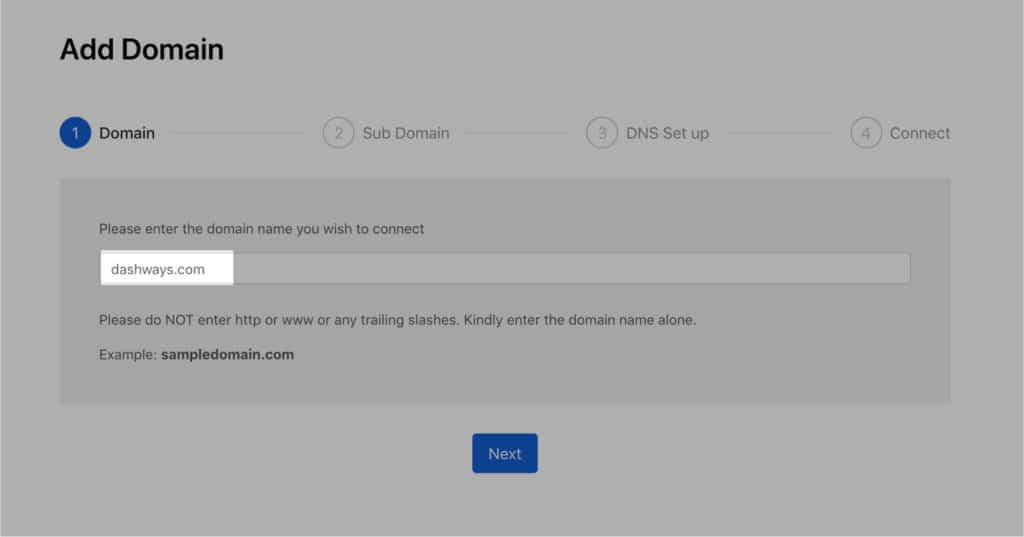
Go to your Swipe Pages dashboard, and go to the Domains tab, then click on Add New Domain. Enter your root domain here without the www, and go on to the next step.
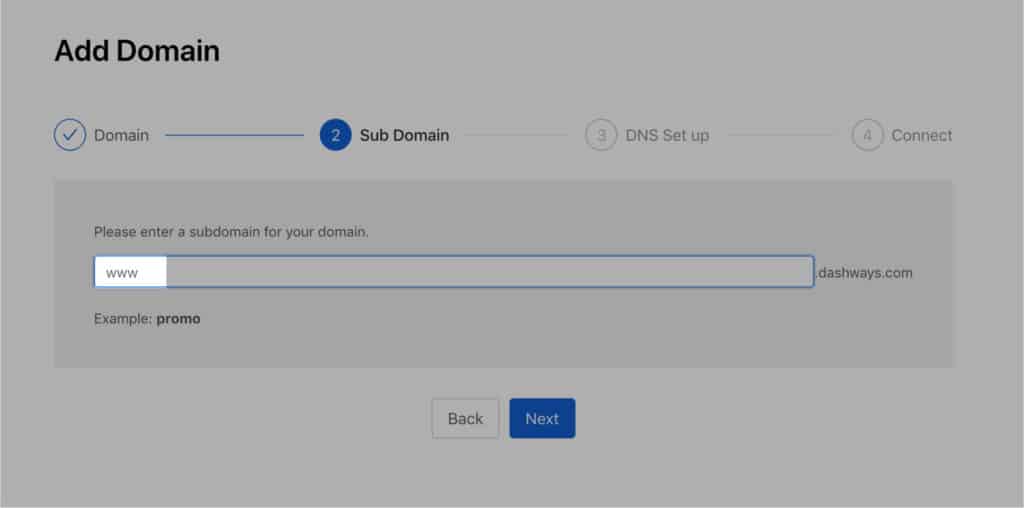
When asked to enter your subdomain, fill in "www", then proceed on.
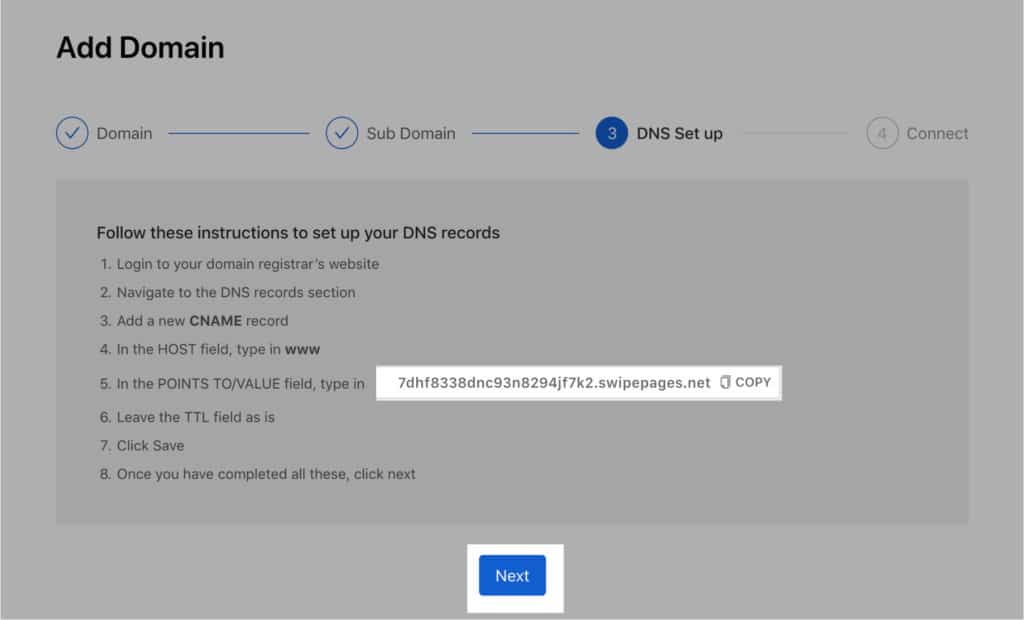
You will be given a VALUE field, copy that to your clipboard.
On Cloudflare, head over to the DNS tab, and click on Add record.
Important Note ( 20 January 2022): Do not set 1.1.1.1 as the IPv4 address for your A record as this will lead to Cloudflare Error 1034 - Edge IP Restricted.


On Cloudflare, head over to the DNS tab, and click on Add record again.

Head back to Swipe Pages and click on the Connect button to verify your domain. You may need to wait until the DNS is fully propagated. Once done, create a sample page and map it to your custom domain to test that this is working. You should be able to load your page with the www in your subdomain.

In order to redirect your non-www visitors to the www version, we will need to set up a page rule on Cloudflare. Head over to the Page Rules tab, and click on Create Page Rule.
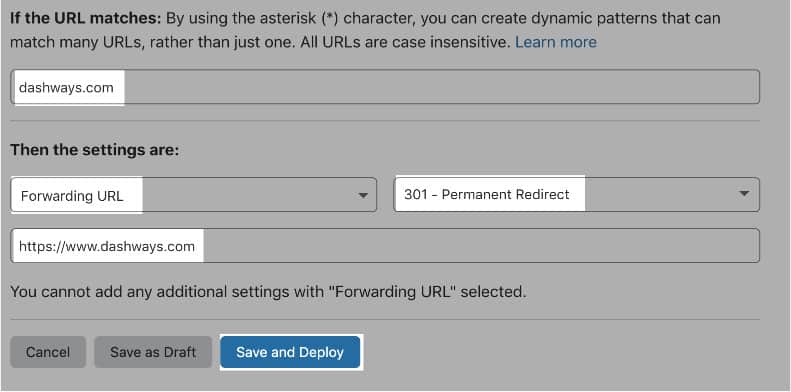
If you are intending to create a site with multiple pages, eg. www.dashways.com, www.dashways.com/services, www.dashways.com/contact, etc, then you will want your page rule to cover all your pages, not just for the homepage. With reference back to Step 6, use this version instead:
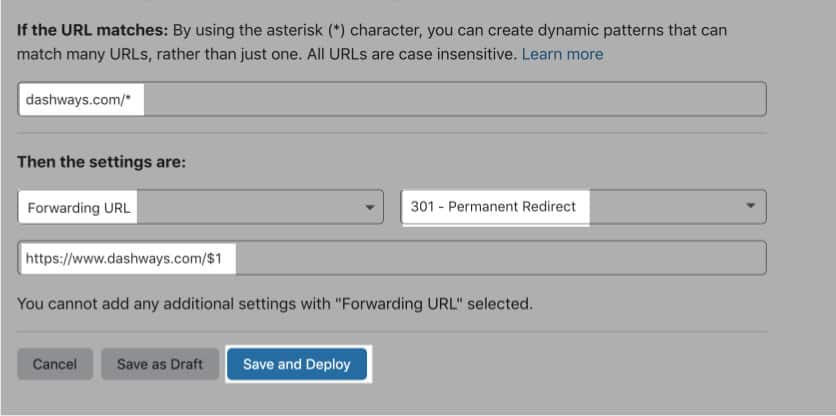
With this rule in place instead, all pages, not just the homepage, which are directly entered in as a root domain, will be redirected to the www version. As a general rule of thumb, you should be using wildcard matching by default.
I hope that this guide gave you more clarity into how CNAME functions, and helped you out with your custom domain configuration on Swipe Pages.
In my next post, I will be sharing a little trick on how you can set up your CNAME once, and never have to touch it again even if you create new subdomains on Swipe Pages.
